Car Battery Positive Red How to Connect and Install It Right
The car battery positive red terminal is the key to starting your engine and powering every electrical system in your vehicle. Connecting it the right way keeps your battery healthy and prevents dangerous short circuits. This guide walks you through identification, installation, and maintenance so you can do it safely at home.
Every time you turn your key or press the start button, your car battery positive red terminal does the heavy lifting. It delivers the electrical jolt your engine needs to fire up and keep running. Yet most drivers never think about this small red piece of metal until something goes wrong.
If you have ever opened the hood and felt confused by the cables and terminals, you are not alone. The good news is that connecting the positive red battery terminal is simple once you know the steps. In this guide, we break it all down. You will learn how to identify the right terminal, connect it safely, avoid common mistakes, and keep your battery in top shape for years to come.
Whether you are replacing an old battery, installing a new one, or just cleaning up the connections, this article has you covered. Let us dive in and make sure your car battery positive red connection is done right the first time.
Key Takeaways
- Red means positive: The red terminal and red clamp always carry the positive charge on a 12-volt battery.
- Connect red first, disconnect red last: This safety rule prevents sparks and electrical damage.
- Clean terminals before connecting: Corrosion on the battery post causes poor performance and voltage drops.
- Use the right tools: A wrench, wire brush, and anti-corrosion spray make the job easy and safe.
- Watch for warning signs: Dim lights, slow cranking, and swelling signal it is time to inspect your battery cables.
- Safety comes first: Always wear gloves and goggles when working with car batteries.
📑 Table of Contents
- What Is the Car Battery Positive Red Terminal?
- How to Identify the Positive Terminal on Your Car Battery
- Step-by-Step Guide to Connecting the Positive Red Cable
- Common Mistakes When Connecting the Positive Red Terminal
- Battery Maintenance Tips for the Red Positive Terminal
- When to Replace Your Battery Cables and Terminals
- Key Takeaways
- Conclusion
What Is the Car Battery Positive Red Terminal?
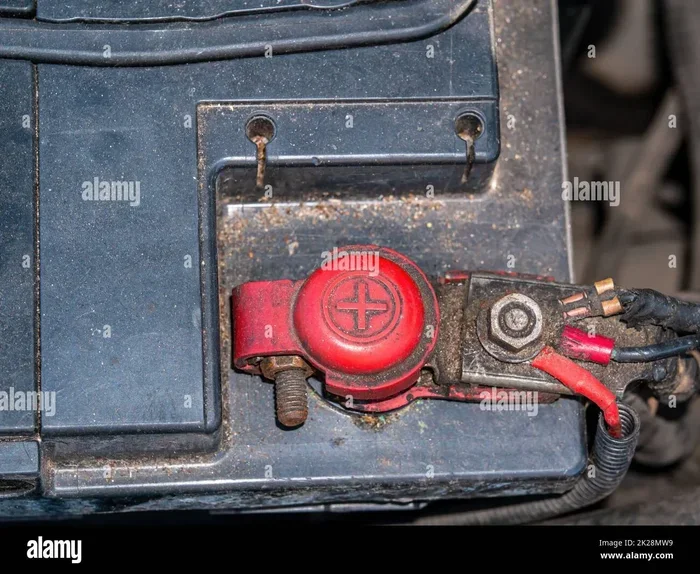
Every car battery has two terminals. One is positive, and one is negative. The positive terminal is almost always marked with the color red and a plus sign (+). The negative terminal is usually black and marked with a minus sign (−). This color coding is a universal standard across most vehicles.
The car battery positive red terminal connects to the positive battery cable. This cable carries power from the battery to the starter motor, alternator, and all the electrical components in your car. Without a solid connection at this terminal, your vehicle simply will not start.
Why Does the Positive Terminal Use Red?
Colors on batteries are not random. They serve as a quick visual guide to prevent dangerous mix-ups. The red positive terminal helps you identify the right post in seconds, even in a dark garage. This simple design choice has saved countless people from accidental short circuits.
The red color also matches the red clamp or ring connector found on the positive battery cable. When you see red, you know it is the high-voltage side of the battery. Always treat this terminal with respect and caution.
How to Identify the Positive Terminal on Your Car Battery
Before you touch any cable, you need to confirm which terminal is positive. Here is how to do it quickly and safely.
First, look for the color. The positive red battery terminal will have a red plastic cover, a red wire, or a red clamp. Next, look for the plus sign (+) printed on the battery case near the terminal. Most batteries also have the word POSITIVE or just POS stamped nearby.
If the color has worn off or the markings are unclear, check your owner’s manual. The manual will show a diagram of the battery layout. You can also use a multimeter set to DC voltage. Touch the red probe to one terminal and the black probe to the other. The terminal that reads a positive voltage is your positive red terminal.
Quick Tips for Identifying Terminals
- Always look for the red color first. It is the fastest visual cue.
- Check for the plus sign (+). It is usually molded into the plastic battery case.
- Follow the red cable. The wire leading from the red terminal is the positive cable.
- Never rely on cable length or thickness. Both terminals can look similar at a glance.
- When in doubt, consult the owner’s manual. It is the most reliable source for your specific vehicle.
Step-by-Step Guide to Connecting the Positive Red Cable
Connecting the car battery positive red terminal correctly is essential for safety and performance. Follow these steps in order every time.
Step 1: Gather Your Tools
You will need a few basic items before you start. A combination wrench that fits your terminal bolt is the most important tool. A wire brush or terminal cleaner helps remove corrosion. Anti-corrosion spray or petroleum jelly protects the connection. Wear rubber gloves and safety goggles to protect your hands and eyes.
Step 2: Inspect the Battery and Terminals
Look closely at the battery. Check for cracks, leaks, or swelling. If the battery case looks damaged, do not attempt to connect anything. Replace the battery first. Next, inspect the positive red terminal and the battery post. If you see white, blue, or greenish buildup, that is corrosion. Use your wire brush to clean it away until the metal shines.
Step 3: Position the Positive Cable
Take the positive battery cable, which has the red clamp or red marking. Place the ring connector or clamp over the positive red terminal. Make sure it sits snugly on the post. The cable should move freely without excessive wobble.
Step 4: Tighten the Terminal Bolt
Use your wrench to tighten the bolt that holds the cable onto the terminal. Tighten it firmly, but do not over-tighten. You want a secure connection that does not slip. A loose positive red connection can cause voltage drops, flickering lights, and starting problems.
Step 5: Apply Anti-Corrosion Protection
Once the bolt is tight, apply a thin layer of anti-corrosion spray or petroleum jelly to the terminal and the cable clamp. This simple step prevents future buildup and extends the life of your battery terminal connections.
Step 6: Repeat for the Negative Terminal
After the positive terminal is secure, move on to the negative (black) terminal. Always connect the positive first and the negative second. This order reduces the risk of sparks near the battery, where hydrogen gas can accumulate.
Common Mistakes When Connecting the Positive Red Terminal
Even simple tasks can go wrong if you skip steps or rush through them. Here are the most common mistakes drivers make with their car battery positive red terminal.
Connecting the Negative Terminal First
This is the number one mistake. If you connect the black negative cable first, you create a risk of short circuits. The wrench or tool you use can easily touch metal parts of the car and create a spark. Always connect the positive red cable first, then the negative black cable.
Forgetting to Clean the Terminals
Corrosion acts like an insulator. It blocks the flow of electricity between the cable and the battery post. A dirty positive red terminal can cause slow cranking, dim headlights, and battery drain. Always clean both the terminal and the cable clamp before connecting them.
Over-Tightening the Bolt
Too much force can crack the battery post or strip the thread. It can also warp the terminal clamp, creating a loose fit over time. Tighten until snug. You should not need to use your full body weight on the wrench.
Using Damaged Cables
If the positive cable has frayed wires, cracked insulation, or a melted clamp, replace it immediately. A damaged positive battery cable is a fire hazard and a starting failure waiting to happen.
Skipping the Anti-Corrosion Step
Some people connect everything and walk away. This is a missed opportunity. A little spray or jelly goes a long way in preventing future problems. It keeps your battery terminal connections clean and conductive for months.
Battery Maintenance Tips for the Red Positive Terminal
Once your car battery positive red terminal is connected properly, a little maintenance goes a long way. Here are simple habits that keep your battery healthy.
Inspect the Terminals Monthly
Pop the hood once a month and take a look at both terminals. Look for any green, white, or blue buildup. If you spot it, clean it with a wire brush. Early detection prevents bigger problems down the road.
Keep the Battery Charged
A fully charged battery lasts longer. If your car sits idle for long periods, use a battery maintainer or trickle charger. This keeps the voltage steady and prevents sulfation inside the battery cells.
Drive Your Car Regularly
Short trips are actually harder on your battery than long drives. The alternator needs time to recharge the battery fully. Try to take longer drives at least once a week if possible. This simple habit improves your battery health significantly.
Check the Cable Connections
Over time, vibrations from driving can loosen terminal connections. Periodically check that the red positive clamp is tight. Give it a gentle tug. If it moves, tighten it with your wrench.
Replace Old Batteries on Time
Most car batteries last between three and five years. Mark the installation date on the battery case with a marker. When you approach the three-year mark, have a professional test the battery. A failing 12-volt battery puts extra stress on the terminals and cables.
When to Replace Your Battery Cables and Terminals
Even with great care, battery cables and terminals wear out eventually. Knowing when to replace them saves you from unexpected breakdowns.
Look for these warning signs. Your engine cranks slowly or struggles to start. The headlights dim when you idle. You notice a clicking sound when you turn the key but the engine does not catch. These symptoms often point to a failing positive red cable or corroded terminal.
Visually inspect the cables for cracks, brittleness, or exposed wires. If the red insulation on the positive cable is frayed or melted, replace the cable immediately. A battery cable replacement is an affordable repair that prevents bigger electrical issues.
If you see deep pitting or heavy corrosion on the positive red terminal itself, replacement may be necessary. Some terminals can be cleaned and reused. Others are integrated into the cable and must be replaced as a unit. Your mechanic can help you decide.
Quick Tip: Test Your Battery Voltage
A healthy battery should read 12.6 volts or higher when the engine is off. When the engine is running, the voltage should be between 13.7 and 14.7 volts. If your readings are low, the positive red terminal connection could be to blame. Clean it, tighten it, and retest. If the voltage does not improve, it is time for a new battery or cable set.
Key Takeaways
- The red terminal is always positive: Remember the red color and plus sign (+). Never confuse it with the black negative terminal.
- Connect red first, disconnect red last: This order protects you from sparks and electrical damage.
- Clean before you connect: Remove corrosion from the battery post and cable clamp for a solid connection.
- Tighten snugly, not too hard: A secure fit prevents voltage drops without risking damage to the battery post.
- Protect with anti-corrosion spray: This simple step saves you from future maintenance headaches.
- Inspect regularly: Monthly checks catch problems early and extend battery life.
- Replace worn cables promptly: Frayed or damaged cables are a safety risk and a starting problem.
Conclusion
The car battery positive red terminal is more than just a colored piece of metal. It is the gateway that delivers power to your entire vehicle. Connecting it the right way, maintaining it regularly, and knowing when to replace it keeps your car reliable and safe.
By following the steps in this guide, you have the knowledge to handle your battery with confidence. You know how to identify the positive terminal, connect the red cable safely, avoid common mistakes, and perform basic maintenance. These skills save you time and money at the shop.
Take a moment right now to pop your hood and check your positive red battery terminal. Look for corrosion. Check the tightness of the clamp. Apply some anti-corrosion spray if it has been a while. These small actions make a big difference. Your car will start easier, run smoother, and last longer. Take care of your battery, and it will take care of you every time you turn that key.
Frequently Asked Questions
What happens if you connect the positive red terminal to the wrong battery post?
Connecting the positive red cable to the wrong post creates a short circuit. This can blow fuses, damage the alternator, or even cause a fire. Always double-check the markings before you connect anything. The red terminal is always positive and should only connect to the positive battery post.
Can I use the same wrench for both the positive and negative terminals?
Yes, but always clean the wrench between terminals. Residue from the negative terminal can cause corrosion on the positive red terminal. Using a clean wrench for each connection is a good habit that protects your battery health.
How do I know if my positive red terminal has a bad connection?
Signs of a poor connection include slow engine cranking, flickering dashboard lights, and a clicking sound when you turn the key. You may also notice the red clamp feels warm to the touch. If you see any of these signs, inspect the positive battery terminal for corrosion or looseness.
Is it safe to touch the positive red terminal with my bare hands?
The terminal itself is not live when the engine is off. However, touching both terminals at the same time with a metal tool can create a dangerous spark. Always wear rubber gloves when working on your car battery positive red terminal, especially when the engine is running.
Does the positive red terminal get hot during normal use?
A slight warmth is normal, especially during heavy electrical use like starting the engine. However, if the positive red terminal is too hot to touch or shows signs of melting, stop driving immediately. This could indicate a charging system problem or a loose connection that needs urgent attention.
How often should I replace my battery cables and terminals?
Most battery cables last five to seven years with proper care. The positive red terminal may need replacement sooner if it shows heavy corrosion or physical damage. Inspect your cables and terminals every few months, and replace them at the first sign of wear or electrical problems.