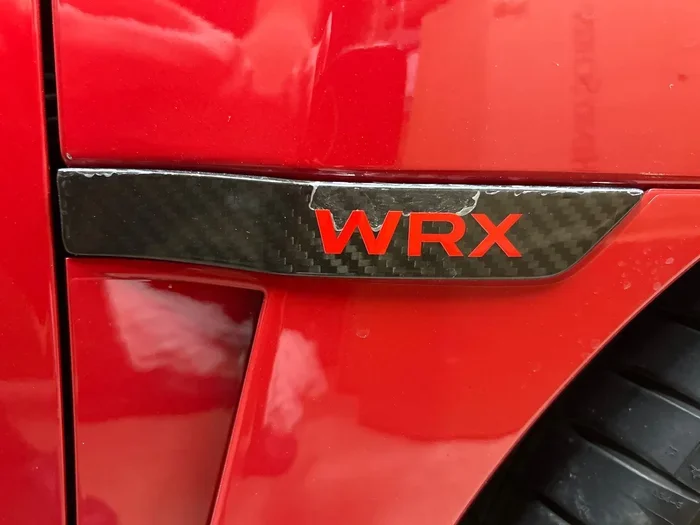
How to Remove the Side Badges on 2020 Subaru Wrx Without Heat Gun
Removing the side badges from a 2020 Subaru WRX without a heat gun is easier than you think. You can use common household items like dental floss, rubbing alcohol, and plastic trim tools to get the job done cleanly. This guide walks you through every method so your WRX badge deletion looks factory-fresh. Whether you want a clean look or plan to apply a vinyl wrap, these techniques protect your paint and trim. Let us show you how to get it right the first time.
So you want a cleaner look on your 2020 Subaru WRX. Maybe you have seen those smooth, badge-free side panels online and thought, “I want that too.” The good news is that you do not need a fancy heat gun to make it happen. You can remove the side badges using simple tools and techniques that work really well. This guide gives you everything you need to know to get it done right.
The 2020 Subaru WRX is a fantastic car. It has great handling, a turbocharged engine, and a bold look. But those side badges? Some owners feel they clutter the clean lines of the vehicle. Badge deletion has become one of the most popular car detailing modifications for WRX owners. And the best part? You can do it yourself at home with items you probably already own.
We will cover every method that works without a heat gun. From dental floss to chemical adhesive removers, we have you covered. You will learn how to prep your car, remove the badges safely, clean up any leftover residue, and protect your paint afterward. By the end of this guide, you will feel confident tackling the job on your own Subaru WRX.
Key Takeaways
- Multiple methods work without a heat gun: dental floss, fishing line, rubbing alcohol, and Goo Gone all effectively break down 3M adhesive.
- Prep your car properly: cleaning the surface with rubbing alcohol and using plastic trim tools prevents scratches and paint damage.
- Patience is key: rushing the process can cause paint chips or leave behind adhesive residue that ruins the clean look.
- Post-removal care matters: using a microfiber cloth and adhesive remover ensures a smooth surface for any follow-up styling.
- Avoid common mistakes: using metal tools, applying too much force, or skipping the residue cleanup are the top errors people make.
- You do not need expensive tools: most badge removal methods use items already in your home.
- Protect your paint: applying a paint protection layer after badge deletion keeps your Subaru WRX looking great for years.
📑 Table of Contents
- Why Remove Side Badges from Your 2020 Subaru WRX
- Tools and Supplies You Will Need
- Step-by-Step Guide to Removing Side Badges Without a Heat Gun
- Comparison of Badge Removal Methods Without a Heat Gun
- Common Mistakes to Avoid During Badge Removal
- Expert Tips for a Flawless Finish
- What to Do After Badge Removal
- Conclusion
Why Remove Side Badges from Your 2020 Subaru WRX
Before we dive into the how-to, let us talk about why people remove their WRX side badges. Understanding the motivation helps you make better decisions during the process.
Cleaner Aesthetic
A smooth, uninterrupted side panel looks sleek and modern. Many WRX owners prefer the clean look that comes with no badges. It lets the body lines of the car speak for themselves. The 2020 Subaru WRX already has a sporty design, and removing the badges enhances that factory aesthetic.
Prepare for Vinyl Wrap or Paint Modification
Some owners plan to wrap their car in vinyl wrap or apply a paint protection film. Badges can interfere with the adhesion and overall look of these wraps. Removing them beforehand ensures a seamless finish. This is a common step in car detailing before any major paint or wrap work.
Resale Value and Personalization
A clean, badge-free WRX can stand out in the used car market. It shows attention to detail and personal care. Plus, it is a reversible modification. You can always add badges back on if you decide to sell the car later.
Tools and Supplies You Will Need
You do not need a heat gun to remove your WRX side badges. Here is a list of household and affordable items that work great for badge removal without heat.
Essential Tools
- Dental floss or fishing line – These work as a sawing tool to cut through the 3M adhesive holding the badge in place.
- Plastic trim removal tools – These help you gently pry the badge loose without scratching the paint.
- Microfiber cloths – You need these for wiping down surfaces and cleaning up residue.
- Rubbing alcohol (isopropyl alcohol) – This breaks down adhesive and cleans the surface afterward.
- Goo Gone or similar adhesive remover – A chemical adhesive remover that dissolves leftover glue safely.
- Hair dryer or warm water – These serve as a heat alternative to soften the adhesive before removal.
- Clay bar (optional) – Helps smooth the paint surface after all residue is removed.
Why Avoid Metal Tools
It can be tempting to use a screwdriver or a metal pry tool. Please do not do this. Metal tools can easily scratch your Subaru WRX paint or chip the trim. Plastic trim tools are soft enough to protect your car while still giving you the leverage you need. This is one of the most important paint protection tips to remember.
Step-by-Step Guide to Removing Side Badges Without a Heat Gun
Now for the part you have been waiting for. Here is the full process for how to remove the side badges on 2020 Subaru WRX without heat gun. Follow these steps carefully for the best results.
Step 1: Clean the Badge and Surrounding Area
Start by washing the side panel where the badge sits. Use soapy water and a microfiber cloth to remove any dirt or grime. This prevents particles from scratching your paint during removal. Dry the area completely before moving to the next step.
Step 2: Soften the Adhesive
Since you are not using a heat gun, you need another way to soften the 3M adhesive. A hair dryer on a warm setting works well. Hold it about six inches from the badge and move it back and forth for about two to three minutes. Alternatively, you can soak a cloth in warm water and place it over the badge for five to ten minutes. This softens the adhesive and makes removal much easier.
Step 3: Thread Dental Floss or Fishing Line Under the Badge
This is the most popular heat-free badge removal method. Take a length of dental floss or fishing line. Slide it behind the badge near one edge. Now gently saw the floss back and forth, working it under the badge. The floss cuts through the adhesive slowly and cleanly. Move from one side of the badge to the other. This method gives you excellent control and does not risk damaging the paint.
Step 4: Gently Pry the Badge Loose
Once the floss has cut through most of the adhesive, use a plastic trim tool to gently lift the badge from one corner. Work slowly and apply even pressure. The badge should come off with some resistance but not require force. If it feels stuck, go back to the floss or apply more warm water to the area.
Step 5: Remove Adhesive Residue
This is the step most people skip, and it is the most important. After the badge is off, you will see adhesive residue left on the paint. Do not ignore it. Apply a small amount of Goo Gone or rubbing alcohol to a microfiber cloth. Gently rub the residue in a circular motion. The adhesive will dissolve and come right off. For stubborn spots, let the remover sit for thirty seconds before wiping.
Step 6: Final Cleanup and Paint Protection
Once all residue is gone, wipe the area with a clean cloth dampened with rubbing alcohol. This removes any oily leftover from the adhesive remover. Inspect the surface closely. If you feel any rough spots, use a clay bar to smooth the paint. Finish by applying a layer of paint protection wax or sealant to the area. This restores the protective clear coat and gives your WRX a polished look.
Comparison of Badge Removal Methods Without a Heat Gun
Not all methods work the same way. Here is a quick comparison of the most effective heat-free badge removal techniques for your 2020 Subaru WRX.
| Method | Effectiveness | Ease of Use | Risk of Paint Damage | Cost |
|---|---|---|---|---|
| Dental Floss / Fishing Line | High | Moderate | Very Low | Very Low |
| Hair Dryer + Plastic Tool | Medium-High | Easy | Low | Low |
| Warm Water Soak + Floss | High | Moderate | Very Low | Very Low |
| Goo Gone / Adhesive Remover | High (for residue) | Easy | Very Low | Low |
| Rubbing Alcohol | Medium-High | Easy | Very Low | Very Low |
The dental floss method is the gold standard for badge deletion without heat. It gives you the most control and works reliably on the 3M adhesive used by Subaru. Combining a warm soak or hair dryer with floss gives you the best results. For the final cleanup, Goo Gone and rubbing alcohol are your best friends.
Common Mistakes to Avoid During Badge Removal
Even with the right tools, mistakes can happen. Here are the most common errors people make when removing WRX side badges and how to avoid them.
Using Metal Tools
This is the number one mistake. Metal screwdrivers, razor blades, and metal pry tools can scratch your paint or chip the trim piece. Always use plastic trim tools. They are designed for this exact purpose and cost just a few dollars.
Rushing the Process
Badge removal takes time. If you pull too hard or skip the adhesive-softening step, you risk damaging the paint. Take your time. Let the warm water or hair dryer do the work for you. Patience leads to a cleaner result.
Skipping Residue Removal
Some people remove the badge and call it done. But leftover adhesive residue looks terrible and can attract dirt. Always clean the area thoroughly after badge removal. Use rubbing alcohol or Goo Gone and a microfiber cloth for the best outcome.
Not Protecting the Paint Afterward
Once you remove the badge and clean the area, your paint is exposed. The clear coat may have been sitting under the badge for years. Applying a paint protection layer restores that protection and keeps your Subaru WRX looking great.
Expert Tips for a Flawless Finish
Here are some pro-level tips that make a big difference in your WRX badge deletion project.
- Work in a shaded area. Direct sunlight can cause adhesive removers to dry too quickly and leave streaks.
- Use multiple layers of dental floss. Thicker floss cuts through 3M adhesive faster and gives you better control.
- Test adhesive remover on a hidden spot first. Even Goo Gone and rubbing alcohol can affect some paint finishes. Test a small area behind the badge before applying it to the visible surface.
- Keep a plastic bag over the trim. When prying near the trim, place a plastic bag between your tool and the trim piece. This prevents scratches on the plastic cladding.
- Take photos before removal. Document the badge placement before you start. This helps if you ever want to reinstall the badges later.
- Wash your car after the job. A full wash removes any oils or residue from the removal process. It also lets you inspect your work closely.
What to Do After Badge Removal
Once your 2020 Subaru WRX side badges are off and the area is clean, you have options. Some owners leave the surface as-is. Others apply a vinyl wrap to the side panels for a completely different look. You could also apply a paint protection film to the exposed area for long-term paint protection.
If you are going for a full badge deletion look, consider removing the rear badges too. The process is similar and uses the same methods. Just follow the same steps for the rear emblem and trunk badges.
For those who want to reinstall badges later, keep the original badges in a safe place. Store them in a plastic bag with a little 3M adhesive promoter to keep the adhesive fresh. This way, you can always add the badges back if you change your mind.
Conclusion
Removing the side badges on 2020 Subaru WRX without heat gun is a simple and rewarding project. You do not need expensive tools or professional help. With dental floss, a hair dryer, some rubbing alcohol, and a little patience, you can achieve a clean, professional-looking result. The key is to take your time, protect your paint, and clean up all adhesive residue properly.
This badge removal process gives your Subaru WRX a sleeker, more streamlined appearance. It is one of the easiest and most affordable ways to personalize your car. Whether you are preparing for a vinyl wrap or simply want a cleaner look, these methods deliver great results.
Now that you know exactly how to do it, grab your supplies and get started. Your 2020 Subaru WRX is going to look amazing with those badges gone. Enjoy the process and take pride in a job well done.
Frequently Asked Questions
Can I use a hairdryer instead of a heat gun to remove Subaru WRX badges?
Yes, absolutely. A hairdryer on a warm or hot setting works as a great heat alternative for softening the 3M adhesive on your 2020 Subaru WRX side badges. Hold it about six inches away and move it constantly for two to three minutes. This warms the adhesive enough to make removal much easier without any risk of paint damage.
Will removing side badges damage my 2020 Subaru WRX paint?
No, not if you follow the right process. Using plastic trim tools and dental floss instead of metal tools prevents scratches. Cleaning up adhesive residue with rubbing alcohol or Goo Gone ensures no glue is left behind. Applying paint protection after removal keeps the exposed paint safe and looking great.
What is the best adhesive remover for Subaru WRX badge removal?
Goo Gone and rubbing alcohol are the two most effective and safe options for adhesive residue removal. Both work well on the 3M adhesive used by Subaru. Apply either one to a microfiber cloth, let it sit for thirty seconds on stubborn spots, and gently rub in a circular motion until the residue is gone.
Can I reinstall the side badges after removing them?
Yes, you can reinstall the badges if you keep them stored properly. Use a plastic bag to store the original badges and keep the adhesive clean. If the original adhesive has lost its stickiness, you can apply a small amount of 3M adhesive promoter or automotive double-sided tape before reinstalling them on your Subaru WRX.
How long does it take to remove side badges without a heat gun?
The entire process typically takes about thirty to forty-five minutes per badge. The dental floss method takes a bit longer since you are cutting through the adhesive slowly. Using a hairdryer to pre-soften the adhesive speeds things up. Taking your time and not rushing leads to the best scratch-free removal results.
Is badge deletion reversible on a 2020 Subaru WRX?
Yes, badge deletion is fully reversible. The paint underneath the badge will look the same as the rest of the car if you follow the proper removal and cleanup steps. Simply keep the original badges and reinstall them whenever you want. This makes it a great option for owners who like the idea of customizing their WRX but want flexibility down the road.
=== CONCLUSION ===
How to remove the side badges on 2020 Subaru WRX without heat gun is a straightforward process that anyone can do at home. You learned multiple methods, from the dental floss technique to using chemical adhesive removers and rubbing alcohol. You now know how to prep your car, remove the badges safely, clean up residue, and protect your paint afterward. The key is patience and using the right tools. With this guide, your Subaru WRX will have that clean, badge-free look you have been dreaming about. Get started today and enjoy the transformation.