Tire Removal Made Simple The Complete Step by Step Guide
Tire removal is a fundamental car maintenance skill every driver should know. This guide walks you through the entire process safely, from gathering your tools to finishing the job right. You will learn the exact steps, common mistakes to avoid, and expert tips that save time and money.
Key Takeaways
- Preparation is key: Having the right tools and a safe workspace makes tire removal smooth and stress-free.
- Follow the steps in order: Loosening lug nuts, jacking the vehicle, removing the wheel, and breaking the bead are the core stages.
- Safety first: Always use a jack stand and never work under a vehicle supported only by a jack.
- Avoid common mistakes: Skipping steps or using the wrong tools can damage your vehicle or cause injury.
- Post-removal care matters: Inspecting your tire and rim after removal helps you spot problems early.
- Know when to call a pro: Some situations require professional tire service for safety and proper results.
📑 Table of Contents
Why Tire Removal Matters for Every Driver
Flat tires happen to everyone. They do not care if you are on a highway, a quiet neighborhood street, or a remote back road. Knowing how to remove a tire puts you back in control. It saves you time and money. It also keeps you safe when you cannot wait for roadside assistance.
Tire removal is not just about swapping a flat for a spare. It is part of a bigger picture of vehicle maintenance. Regular tire care includes checking pressure, inspecting tread depth, and rotating tires. When you remove a tire properly, you give yourself the chance to inspect every part of the wheel. You can spot slow leaks, uneven wear, or hidden damage before it becomes a bigger problem.
Many drivers skip learning this skill because they think it is too hard. It is not. With the right guidance and a little practice, anyone can do it. This guide breaks the entire process down into simple, easy-to-follow steps. Whether you are a complete beginner or just need a refresher, you will find everything you need right here.
Tools You Need for Tire Removal
Before you start, gather everything you need. Having the right tire removal tools ready saves frustration and keeps you safe. Here is what you should have on hand:
Essential Tools
- Hydraulic jack or scissor jack to lift the vehicle
- Lug wrench or wheel wrench for loosening lug nuts
- Jack stand for stable support under the vehicle
- Tire iron or breaker bar for stubborn lug nuts
- Tire deflator tool if you need to remove the tire from the rim
- Lubricant or penetrating oil for rusted or stuck lug nuts
- Gloves and safety glasses for personal protection
Nice-to-Have Extras
- A torque wrench to tighten lug nuts to the correct specification
- A tire changing kit with a portable compressor
- Wheel chocks to prevent the vehicle from rolling
- A cloth or mat to kneel on
Keeping these tools in your trunk means you are always prepared. Check your vehicle maintenance kit every few months to make sure nothing is missing or expired.
Step-by-Step Tire Removal Process
Now let us get into the heart of the guide. Follow these steps carefully for a safe and successful wheel removal experience.
Step 1: Park Safely and Prepare the Vehicle
Find a flat, solid surface. Avoid hills or soft ground if possible. Turn on your hazard lights and apply the parking brake. Place wheel chocks behind the tires that are still on the ground. This prevents the car from rolling while you work.
Get your tools together before you start. You do not want to be halfway through the job and realize you forgot something important.
Step 2: Loosen the Lug Nuts
Use your lug wrench to turn each lug nut counterclockwise. Do this while the tire is still on the ground. The ground provides resistance that helps you break the nuts free. You do not need to remove them completely yet. Just loosen them about a quarter turn.
If a lug nut feels stuck, apply penetrating oil and wait a few minutes. A tire iron or breaker bar gives you extra leverage. Never use excessive force that could damage the nut or the wheel.
Step 3: Jack Up the Vehicle
Place your jack under the vehicle’s designated jack point. This information is in your owner’s manual. Raise the vehicle until the tire is about six inches off the ground. Once the jack is holding steady, place a jack stand under a secure structural point of the frame.
Never rely on a jack alone. A jack can slip or fail, and the vehicle could come down on you. The jack stand is your safety net. This is a critical rule in all car maintenance procedures.
Step 4: Remove the Lug Nuts and Wheel
Now fully unscrew each lug nut. Keep them in a safe place like a pocket or a small container. They are small and easy to lose. Once all nuts are off, gently pull the wheel toward you to slide it off the hub.
If the tire is stuck, give it a firm kick on the sidewall. Sometimes tires bond slightly to the brake rotor or hub, especially after sitting for a while. A gentle kick breaks that seal without damage.
Step 5: Deflate and Break the Bead (If Needed)
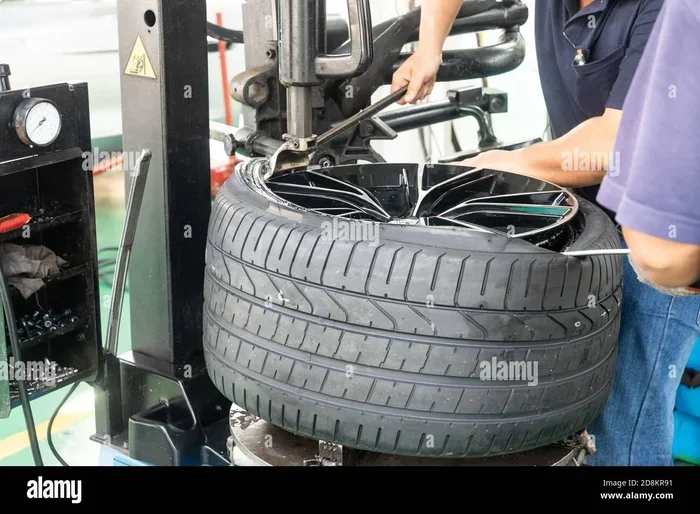
If you are removing the tire from the rim entirely, you need to break the bead. This is the seal between the tire and the rim. First, fully deflate the tire using a valve core tool. Then use a tire lever or a dedicated bead breaker tool to pry the tire edge off the rim.
This step requires patience. Work slowly around the tire. If you are not comfortable doing this yourself, that is completely okay. A professional tire service center can handle it quickly and safely.
Step 6: Inspect and Prepare for Reinstallation
With the tire off, take a moment to inspect everything. Look at the rim for cracks or damage. Check the hub surface for rust or debris. Examine the tire itself for punctures, bulges, or uneven wear. This inspection helps you decide whether to repair the tire, replace it, or have it professionally serviced.
If you are planning to store the tire, clean it thoroughly and keep it in a cool, dry place away from direct sunlight.
Common Mistakes to Avoid During Tire Removal
Even experienced drivers make mistakes sometimes. Knowing what to avoid keeps you safe and protects your vehicle.
Skipping the Jack Stand
This is the number one danger. Some people think the jack alone is enough. It is not. A hydraulic jack can slip. The floor can shift. Always use a jack stand. Your life is worth more than the few extra minutes it takes.
Loosening Lug Nuts While the Car Is in the Air
Always loosen lug nuts before you jack up the vehicle. If you do it after, the tire can spin freely and you lose the leverage you need. This is a step many people forget, and it causes unnecessary frustration.
Using the Wrong Jack Position
Every vehicle has specific jack points. Placing the jack on the wrong spot can damage the body or cause the jack to slip. Consult your owner’s manual before you lift the vehicle. This small step prevents costly repairs.
Forgetting to Torque Lug Nuts Properly
When you put the tire back on, tighten the lug nuts in a star pattern. Use a torque wrench to achieve the correct tightness. Over-tightening can warp the brake rotor. Under-tightening can cause the wheel to come loose while driving.
Ignoring Tire Pressure After Reinstallation
After reinstalling the tire, check the tire pressure before you drive away. A tire that is underinflated or overinflated affects handling, fuel economy, and safety. Use a reliable tire gauge and match the pressure listed on your driver’s side door jamb.
When to Seek Professional Tire Service
There are times when calling a professional is the smart choice. You do not need to do everything yourself. Here are situations where professional tire service makes the most sense:
- The lug nuts are severely rusted and you cannot break them free
- The tire is damaged beyond a simple repair
- You do not have the right tools or a safe workspace
- The vehicle is heavy or positioned in a dangerous location
- You feel uncertain or uncomfortable at any point
Professional technicians have specialized equipment like hydraulic tire changers and bead breaking machines. They handle the job quickly and safely. If you are ever in doubt, reach out to a trusted local service center. There is no shame in asking for help. What matters most is that the job gets done right.
Protecting Your Tires After Removal
Once you have removed and inspected your tire, proper care ensures it lasts longer. Consider these tips for ongoing tire care:
- Store tires in a cool, dark place away from ozone sources like electric motors
- Keep tires away from solvents, fuels, and grease
- If storing mounted tires, place them in airtight bags to reduce oxidation
- Rotate tires regularly to promote even wear
- Check tire pressure at least once a month
- Inspect tire sidewalls and tread for cracks or foreign objects
For extra protection during storage, you might consider a quality tire sealant or armor product. Products designed for tire protection help guard against dry rot, UV damage, and cracking. Explore options like tire armor products that add a protective layer to keep your tires in top condition for longer.
Also, consider investing in tire changing tools that are high quality and built to last. A good lug wrench, a reliable jack, and sturdy jack stands are investments that pay off every time you need them. Check out our wheel removal guides and equipment recommendations for the best options on the market.
Quick Tips for Faster Tire Removal
Want to get the job done quicker next time? Here are some practical shortcuts:
- Spray penetrating oil on lug nuts the night before you need to change a tire
- Keep a dedicated tire kit in your trunk with everything you need
- Practice at home in your driveway so you are confident when you really need the skill
- Use a power impact wrench if you have access to one for stubborn nuts
- Always tighten lug nuts in a star pattern to ensure even pressure
These small habits make a big difference. They turn a stressful situation into a routine task you can handle in minutes.
Conclusion
Tire removal is a skill that every driver benefits from learning. It empowers you to handle flat tires, perform maintenance, and inspect your wheels with confidence. By following the steps in this guide, you can remove and reinstall a tire safely and efficiently.
Remember the key points: prepare your tools, use a jack stand, loosen lug nuts before lifting, and inspect everything after removal. Avoid the common mistakes that lead to injury or damage. And when the job is beyond your comfort zone, do not hesitate to seek professional help.
Your tires are the only part of your car that touches the road. Taking care of them through proper removal, inspection, and maintenance is one of the best things you can do for your vehicle. Start practicing today, and you will be glad you did the next time a flat tire catches you off guard.
Frequently Asked Questions
How long does tire removal take?
For a single tire, the process usually takes about 15 to 30 minutes if you have the right tools and some experience. Beginners might take a bit longer the first few times, but it gets faster with practice. Having all your tools ready before you start cuts the time significantly.
Can I remove a tire without a jack stand?
No. You should never work under a vehicle supported only by a jack. A jack stand provides the stable, secure support you need to stay safe. Always place a jack stand under the vehicle frame after lifting it with a jack. This is a non-negotiable safety rule in all vehicle maintenance.
What is the bead on a tire and why does it matter?
The bead is the edge of the tire that seals against the rim. It holds air inside the tire and keeps it securely mounted on the wheel. When you remove a tire from the rim, you must break this bead. Using a bead breaker tool makes this process much easier and safer than trying to pry it off by hand.
How do I know if my tire needs repair or replacement?
Small punctures in the tread area can often be repaired. However, if the damage is on the sidewall, the tire is severely worn, or there are bulges or cracks, replacement is the safer choice. A professional tire service can assess the damage and give you a clear recommendation.
Should I grease my lug nuts?
It is not necessary to grease lug nuts for everyday driving. Some people apply anti-seize compound to prevent rust, but this should be done sparingly. Over-greasing can cause the nuts to loosen over time. Always follow the torque specifications in your vehicle owner’s manual for the safest results.
What is the correct tightening pattern for lug nuts?
Always tighten lug nuts in a star or crisscross pattern. This ensures even pressure across the wheel and prevents warping of the brake rotor. Start by hand-tightening all nuts, then use your wrench to snug them down in the same star pattern before lowering the vehicle.
=== CONCLUSION ===
Tire removal does not have to be intimidating. With the right tools, the right knowledge, and a focus on safety, anyone can learn this essential skill. This guide covered everything from preparation and the step-by-step process to common mistakes and post-removal care. You now have a solid foundation to handle flat tires and routine maintenance with confidence.
Keep your tools organized, your tires inspected, and your knowledge growing. Every time you remove a tire, you get a little better at it. And that confidence is worth its weight in gold the next time the road throws a challenge your way.