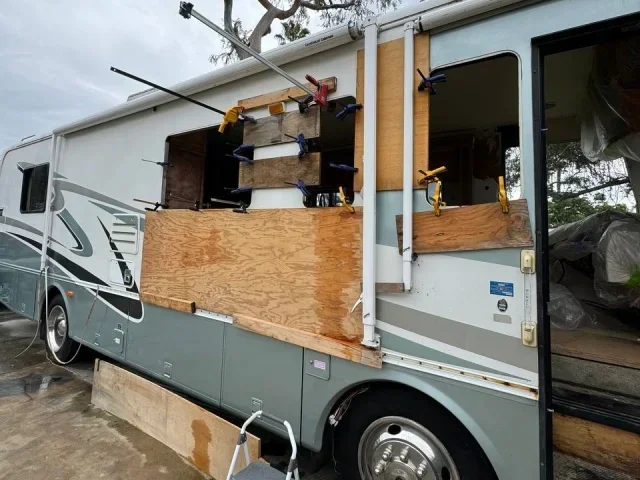
Here Is How to Fix a Water Damaged RV External Wall
A water damaged RV external wall can ruin your camping trips and lead to costly repairs if ignored. This guide walks you through identifying damage, gathering tools, removing the damaged section, prepping the surface, and applying a new wall patch like a pro. You will learn practical steps for both fiberglass and laminate RV walls, plus tips to prevent future water intrusion. By the end, you will feel confident tackling your own RV wall repair.
Key Takeaways
- Early Detection Matters: Catching water damage early saves you time and money on RV wall repair.
- Right Tools Make the Job Easier: Having the correct tools ready before you start makes the process smooth and efficient.
- Choose the Right Patch Material: Matching your RV wall type (fiberglass, laminate, or aluminum) is essential for a lasting fix.
- Waterproofing Is Key: Proper sealing and RV exterior sealant application prevents future leaks and water intrusion.
- Preventive Maintenance Goes a Long Way: Regular RV exterior maintenance keeps your camper wall in great shape year after year.
📑 Table of Contents
- Here Is How to Fix a Water Damaged RV External Wall
- Step 1: Identify and Assess the Damage
- Step 2: Gather Your Tools and Materials
- Step 3: Remove the Damaged Section
- Step 4: Prepare the Surface and Install the Patch
- Step 5: Fill, Sand, and Smooth the Repair
- Step 6: Seal and Waterproof the Repair
- Preventing Future Water Damage on Your RV
- Comparison Table: Patch Materials for RV Wall Repair
- When to Call a Professional for RV Wall Repair
- Final Thoughts on Fixing a Water Damaged RV External Wall
Here Is How to Fix a Water Damaged RV External Wall
Nothing kills the camping spirit faster than discovering a water damaged RV external wall. Maybe you noticed soft spots on the side of your rig. Or perhaps you saw paint bubbling during your last wash. Either way, water damage is a common problem for RV owners, and it only gets worse if you ignore it.
The good news? You do not need to be a professional to fix it. With the right tools, a bit of patience, and this step-by-step guide, you can repair your camper wall damage and get back on the road. This article covers everything from identifying the damage to applying the final sealant coat. Let us dive in.
Water damage happens to every RV at some point. Whether it is a leaky roof, a cracked seal, or standing water after a storm, moisture finds its way in. Over time, it weakens the wall structure, causes RV delamination, and even invites mold. Fixing the problem early keeps your RV structural repair costs low and your rig safe.
Why Water Damages RV External Walls
Your RV exterior faces a lot of weather. Sun, rain, snow, and wind all take a toll. The RV exterior sealant around windows, doors, and seams can crack over time. When that happens, water seeps into the wall layers. Inside, the wall consists of thin laminate, foam insulation, and sometimes plywood. When moisture sits in those layers, the wood rots and the laminate peels away.
This process is called delamination RV damage. The layers separate, and the wall loses its strength. In severe cases, you may need a full camper wall replacement. But most damage is caught early enough for a solid patch repair. Knowing the signs early makes all the difference.
Step 1: Identify and Assess the Damage
Before you grab any tools, you need to understand the full scope of the problem. A small soft spot on the outside might mean big damage inside. Start by inspecting the entire exterior wall carefully.
Run your hand along the wall surface. Feel for soft or spongy areas. Look for discoloration, bubbling paint, or cracked seals. Use a flashlight to check around windows and roof seams. If you see any dark spots, that could mean mold growth inside the wall.
Common Signs of Water Damage on RV Walls
- Soft or spongy spots on the exterior wall surface
- Bubbling or peeling paint on the RV exterior
- Discoloration or dark stains on the wall
- Cracked or dried-out sealant around windows and doors
- Mold or mildew smell coming from the wall area
- Delamination where wall layers start to separate
- Sagging or warping of the wall panel
Once you have identified the damaged area, measure it carefully. Use a tape measure to note the length and width. This helps you cut the right size patch later. Take photos of the damage as well. These help you track progress and are useful if you ever need to file an insurance claim for RV water leak repair.
Step 2: Gather Your Tools and Materials
Having everything ready before you start saves time and frustration. You do not want to stop mid-repair to run to the hardware store. Here is a complete list of what you need for a successful RV wall repair.
Essential Tools for RV Wall Repair
- Utility knife or oscillating multi-tool
- Drill with mixing paddle
- Sandpaper (80-grit and 220-grit)
- Measuring tape and pencil
- Clamps or heavy objects for pressing
- Putty knife or spreader
- Safety gloves, goggles, and mask
- Rags and cleaning solvent
Materials You Will Need
- RV wall patch material (fiberglass, laminate, or aluminum matching your wall type)
- Epoxy filler or fiberglass resin
- RV exterior sealant (silicone or polyurethane-based)
- RV waterproofing membrane
- Primer and exterior paint matching your RV color
- Backing board (plywood or hardboard for structural support)
- Contact cement
Quick Tip: Always match your patch material to your existing RV wall type. A fiberglass RV wall needs a fiberglass patch. A laminate wall needs a laminate patch. Using the wrong material leads to adhesion failure and more damage down the road.
Step 3: Remove the Damaged Section
Now comes the hands-on work. You need to cut out the damaged area cleanly. This step is crucial because any remaining damaged material will compromise your repair.
How to Cut Out Damaged Wall Material
Start by drawing a square or rectangle around the damaged area. Make sure the lines are straight and the corners are at 90-degree angles. Use a straightedge and a pencil to mark your cut lines.
Put on your safety gear before cutting. Wear gloves, goggles, and a dust mask. You do not want to breathe in fiberglass dust or mold spores. Using a utility knife or an oscillating multi-tool, carefully cut along your marked lines. Cut through all layers of the wall — the exterior skin, insulation, and interior laminate.
Once you have cut out the damaged section, remove all loose material from the cavity. Use a putty knife to scrape away any soft or wet spots. Clean the area with a solvent-based cleaner to remove any remaining moisture, dirt, or debris. Let it dry completely before moving to the next step.
Dealing with Mold During RV Wall Repair
If you find mold inside the wall cavity, do not skip this step. Mold spreads fast and can cause health problems. Spray the affected area with a commercial mold remover or a mixture of one part bleach to ten parts water. Let it sit for at least 15 minutes. Scrub the area with a stiff brush and wipe it clean with a damp rag. Allow the wall to dry fully before proceeding. Consider using a mold prevention spray for added protection.
Step 4: Prepare the Surface and Install the Patch
This is the most important step in your RV external wall repair. Proper surface preparation ensures the patch bonds strongly and lasts for years. Take your time with this step.
Preparing the Wall for Patching
Start by sanding the edges of the cut-out area. Use 80-grit sandpaper to rough up the surface. This creates a better bond for the patch material. Wipe away all dust with a clean rag.
Next, cut your backing board to size. The backing board should fit snugly inside the cavity. It gives your patch structural support. Trace the shape of the hole onto a piece of plywood or hardboard and cut it out. The backing board should be about one inch smaller than the hole on all sides.
Apply a thin layer of contact cement to the back of the backing board and the inside edges of the cavity. Let it dry until tacky. Press the backing board firmly into place. Use clamps or heavy objects to hold it while the cement sets. This usually takes about 30 minutes.
Cutting and Applying the Patch
Now it is time to cut your patch material. Trace the shape of the hole onto your patch material, adding about one inch of overlap on all sides. This extra material wraps around the edges and bonds to the existing wall.
Cut out the patch carefully. Use a straightedge and apply firm, even pressure. If you are working with fiberglass, you may need to use a jigsaw with a fine-tooth blade for a clean cut.
Apply epoxy filler or fiberglass resin to the edges of the cavity and the back of the patch. Press the patch firmly into place. Align it carefully so the edges match the surrounding wall surface. Use clamps to hold the patch in position while the epoxy cures. Follow the manufacturer’s instructions for curing time, which is usually 24 hours.
Step 5: Fill, Sand, and Smooth the Repair
Once the patch is securely bonded, it is time to make it look and feel like new. This step involves filling gaps, sanding, and creating a smooth surface.
Filling and Leveling the Patched Area
Apply a layer of epoxy filler over the patch edges and any gaps. Use a putty knife to spread it evenly. Feather the edges so the filler blends smoothly into the surrounding wall. Apply multiple thin layers if needed rather than one thick layer. Each layer should be about 1/16 inch thick.
Let each layer dry or cure according to the product instructions. Between layers, lightly sand with 220-grit sandpaper. This creates a smooth surface for the next layer to bond to. Keep sanding until the patched area is level with the rest of the wall.
Expert Insight: Many RV owners rush this step and end up with visible patches. Take your time with the filling and sanding. The goal is to make the repair invisible. A little extra effort here pays off big time in the final result.
Priming and Painting the Repair
After the final filler layer is smooth and dry, apply a coat of primer to the patched area. Let it dry completely. Then apply exterior paint that matches your RV color. Use a small roller or brush for an even finish. Apply two thin coats rather than one thick coat for the best appearance.
Some RV owners also apply a clear coat over the paint for extra protection against UV rays and weather damage. This is a great idea if you park your RV outdoors year-round.
Step 6: Seal and Waterproof the Repair
The final step in fixing a water damaged RV external wall is sealing everything properly. This is what prevents future leaks and keeps your repair lasting for years.
Applying RV Exterior Sealant
Choose a high-quality RV exterior sealant that is compatible with your wall material. Silicone-based sealants work well for most applications. Polyurethane sealants offer great flexibility and durability.
Apply the sealant around the edges of the repaired area. Use a caulking gun for a steady, even bead. Smooth the sealant with a wet finger or a smoothing tool to create a clean finish. Make sure the sealant covers the entire perimeter where the patch meets the existing wall.
Let the sealant cure for at least 24 hours before exposing your RV to rain or moisture. Check the sealant after the first heavy rain to make sure it is holding up. Reapply if needed.
Adding a Waterproofing Membrane
For extra protection, apply a RV waterproofing membrane over the repaired area. This is especially important if the damage was caused by a roof leak or recurring water intrusion. The membrane adds an extra barrier against moisture and extends the life of your repair.
Roll or brush the membrane onto the exterior wall surface over the patched area. Extend it at least six inches beyond the patch edges. Allow it to dry completely before applying your top coat of sealant or paint.
Preventing Future Water Damage on Your RV
Repairing a water damaged RV external wall is hard work. The best way to avoid doing it again is through regular RV exterior maintenance and RV waterproofing practices.
Simple Habits That Protect Your RV Walls
- Inspect seals every six months. Check the sealant around windows, doors, roof seams, and vents. Reapply sealant if it looks cracked or dry.
- Keep your RV clean. Wash the exterior regularly to remove dirt, debris, and bird droppings that can degrade the wall surface.
- Address leaks immediately. If you notice any water inside your RV, find and fix the source right away. Even small leaks cause big damage over time.
- Store your RV properly. Park under cover when possible. Use a quality RV cover if you store it outdoors.
- Check the roof annually. The roof is the number one source of water intrusion. Inspect it for cracks, gaps, and worn sealant every year.
- Maintain proper ventilation. Moisture buildup inside the RV causes condensation and wall damage. Use vent fans and dehumidifiers to keep humidity levels low.
Common Mistake: Many RV owners only check the exterior when they notice a problem inside. By then, the damage is already done. Make exterior inspections a regular part of your camper maintenance tips routine. A few minutes of checking now saves hundreds of dollars in RV structural repair later.
Comparison Table: Patch Materials for RV Wall Repair
| Material | Best For | Durability | Ease of Use | Cost |
|---|---|---|---|---|
| Fiberglass Patch | Fiberglass RV walls | High — bonds strongly with resin | Moderate — requires resin application | Low to medium |
| Laminate Patch | Laminate or sandwich panel walls | Good — matches existing wall finish | Easy — uses contact cement | Low |
| Aluminum Patch | Aluminum-skinned RVs | Very high — matches original structure | Moderate — requires riveting or bonding | Medium |
| Epoxy Filler Only | Small cracks and surface damage | Medium — best for minor repairs | Easy — spreads like putty | Low |
Choosing the right material depends on your RV wall type and the extent of the damage. For large patches, always use a backing board for structural support. For small surface cracks, epoxy filler alone may be sufficient.
When to Call a Professional for RV Wall Repair
Not every water damaged RV external wall situation is a DIY job. Some cases require professional help. Here are signs that you should call in an expert:
- The damage covers more than 12 square inches
- The wall structure feels completely soft or collapsed
- Mold has spread to multiple wall sections
- The damage is near load-bearing structures
- You have tried a repair and it failed within a few months
- Your RV is still under warranty and DIY repairs may void it
Professional RV water leak repair specialists have the tools, experience, and materials to handle severe damage. They can also inspect your RV for hidden problems you might miss. If you are unsure, it is always worth getting a professional assessment before the damage worsens.
Final Thoughts on Fixing a Water Damaged RV External Wall
Fixing a water damaged RV external wall might seem intimidating at first. But when you break it down into clear steps — assess, gather, cut, patch, fill, seal — it becomes a manageable project. Most RV owners can complete the repair in a weekend with basic tools and materials.
The key to a successful repair is patience and attention to detail. Proper surface preparation, matching your patch material, and thorough sealing make all the difference. And once your repair is complete, regular RV exterior maintenance keeps your rig in great shape for many camping seasons to come.
Do not let a little water damage keep you from enjoying the open road. Follow this guide, take your time, and you will have a strong, weather-tight camper wall repair that holds up against whatever Mother Nature throws your way.
Frequently Asked Questions
How do I know if my RV wall damage is from water?
Look for soft spots, discoloration, bubbling paint, or a musty smell. These are the most common signs of water intrusion. You can also use a moisture meter to check the wall for hidden wetness. If the wall feels spongy or gives slightly when pressed, water damage is likely the cause.
Can I repair a water damaged RV wall myself?
Yes, most minor to moderate water damage can be repaired at home with basic tools and materials. The key is to act quickly and follow proper steps. For extensive damage or structural issues, consider hiring a professional. Start with a small patch if you are new to RV repairs to build your confidence.
How long does an RV wall patch repair last?
A properly done patch repair can last many years, especially when you use quality materials and seal everything correctly. The lifespan depends on the patch material, your climate, and how well you maintain the repair. Annual inspections and sealant touch-ups help extend the life of your fix significantly.
What is the best sealant for RV external walls?
Silicone-based and polyurethane sealants are the best choices for most RV external walls. They offer excellent flexibility, UV resistance, and waterproofing. Make sure the sealant is compatible with your wall material. Always clean the surface thoroughly before applying any sealant for the best bond.
How do I prevent water damage on my RV walls?
Regular maintenance is your best defense. Inspect seals every six months, wash the exterior, address leaks immediately, and store your RV under cover when possible. Using a RV waterproofing membrane on vulnerable areas adds an extra layer of protection against moisture intrusion and future damage.
What causes delamination in RV walls?
Delamination happens when moisture gets trapped between wall layers and causes them to separate. Common causes include cracked exterior seals, roof leaks, damaged window seals, and poor ventilation. Over time, UV exposure and temperature changes weaken the adhesive between layers, making delamination more likely. Regular seal inspections help prevent this issue.
=== CONCLUSION ===
Repairing a water damaged RV external wall is a rewarding DIY project that saves you money and keeps your RV in top shape. From identifying the damage and gathering your tools to cutting out the bad section, applying the patch, and sealing everything up — each step matters. Take your time, follow the instructions, and your repair will hold up for years.
Remember that prevention is always better than cure. Regular RV exterior maintenance, timely sealant replacements, and quick responses to any leaks keep your camper walls strong and dry. Now that you know how to fix the damage, you are ready to hit the road with confidence. Your RV wall repair is done, and your rig is ready for the next adventure.